Installing & Building all Components for Project Exodus
From NEOSYS Dev Wiki
Jump to navigationJump to search
Software to install:
- WinRAR.
- PostgresSQL.
- TortoiseSVN 9(32 bit).
- Boost c++ libraries 1.34.0 .
- Visual Studio C++ Express Edition.
- Downloading & Installing Platform SDK.
Downloading & Installing WinRAR:
- Go to www.download.com.
- In the the search engine, type WinRAR.
- Look for WinRAR 3.7, its would normally be first of the download list.
- Click on the big button saying Download WinRAR.
- You come to another web page, wait for a moment, and a little window pop up asking whether to save or run. It would be advisable to save it in a folder called Downloads.
(If you haven't already done so). - There should be a few moments of downloading, depending on your internet connection. Then click Run, then click Run again.
- Click Install.
- A window should pop up called WinRAR set-up, click Ok.
- Done.
Downloading and Installing PostgresSQL:
Part 1: Downloading & Installing PostgresSQL
- Go to http://www.postgresql.org/
- In the search engine at the top right hand corner copy & paste postgresql-8.1.9-1.zip and press enter.
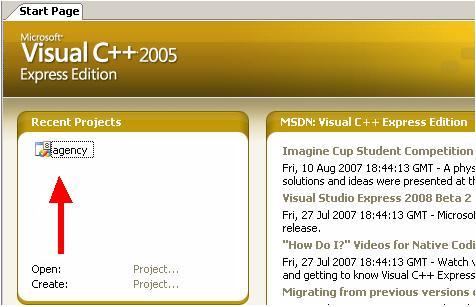
- Click the one pointed to you by the red arrow
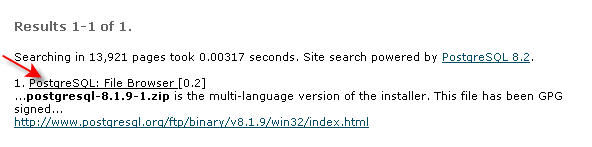
if not included, look for something similar, keeping in mind you need the postgresql-8.1.9-1.zip) - Click on the link shown to you by the red arrow
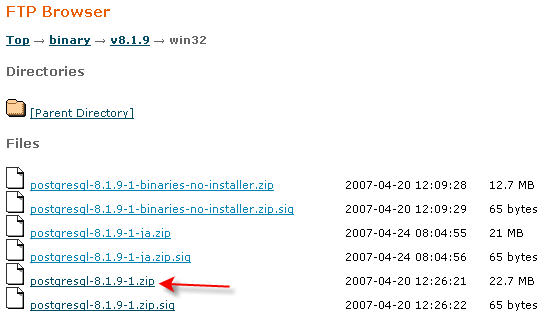
- Click the link "Win32"
- Click the link "postgresql-8.2.5-1.zip"
- Now a window will pop up asking whether you want to save or run the installation program. Save it in your download folder, if you haven't created one do so. The purpose of having a Download file is that every time you download a big file you save it so that you don't have to waste your time downloading it again. However with small files, there is no point in saving them because of the small amount of time they take to download.
- Look in your download folder for postgresql-8.1.9-1.zip
- Right click on postgresql-8.1.9-1.zip click Extract to postgresql-v8.1.9-1.zip\
- Go to the folder you just extracted to in your download folder.
- Double click on the file postgresql-8.1.msi, and to check whether you have the right version, look at the size, is it 134Kb.
- A window should have popped up, saying what language you want to use in the installation. Select your preferred language. (if you have any other windows close them down and SAVE your work)
- This window is important, so don't miss any thing out. Scroll down to Database drivers, and click on the small triangle pointing downwards, a small list of options will appear click "Entire feature will be unavailable".
- Scroll to the very bottom to Development, now just like the other one click on the small triangle pointing downwards and again the options will appear, this time click "Entire feature will be installed on your local driver". Click Next.
- In the next window type into the User name field any random name, as you will not have to remember it. Then click Next. Click Yes. Click Ok.
- In the current window there are some drop down menus you MUST change:
- The field next to Encoding, use the drop down menu to find UTF-8.
- The field next to Locale, use the drop down menu to find your language.
- Type in a password and take a note of it and click Next.
- Then you come to a window called Enable contrib modules, tick Tsearch2 near the right hand side and click Next.
- Then to start the Installation click Next.


Part 2: Set-up & Configuration
- Go to your start menu, all programs, PostgreSQL 8.1, pgadmin III. Click the close button for the tips.
- Double click on PostgreSQL database server 8.1 (Localhost:5432), and it will ask you for the password you took note of in Part1 of the exercise. Type it in.
- On the right hand side of the window there are the files of the SQL Server. To make a new database right click on Database(1)and click the New Database option. Type in NEOSYS into the name field and click Ok.
- On the right hand side of the window look for Login Roles (1), at the bottom of the list.
- Right click it and click the New Login Role.
- Type in NEOSYS into the name field
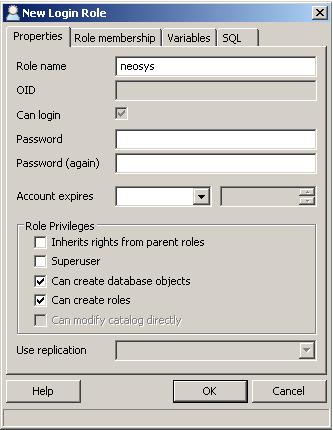
- Type in a pass and make a note of it.

Downloading & Installing Tortoise SVN (32bit):
- Go to your browser, copy and paste the web address into your URL "http://subversion.tigris.org/project_packages.html".
- The web page should have a title of "Subversion packets", and have a dark green theme.
- Scroll down the page, and look for Windows NT, 2000, XP and 2003.
- Look through the text for "If you want a pretty Win32 GUI, TortoiseSVN integrates nicely with the Window Explorer.", near the bottom. Click on the link highlight in blue (tortoiseSVN).
- Look for "Latest Version" in a green bar and underneath that, in the text look for "download page" and click it.
- You should be looking at a web page with a blue tortoise. The title should also be "TortoiseSVN".
- Look for the subheading "Download Application"
- Click on "TortoiseSVN-1.4.5.10425-win32-svn-1.4.5.msi 32 bit.
- You come to a web page with a URL starting with "http://sourseforge.net/ bla bla bla bla", either a window automatically pops up asking whether to save or run, or you right click on a beige horizontal bar at the top of the web browser window, and select "Download file".
- Click Save, and save the file into your download folder. (make a folder named download, if you haven't already done so) then click Run, and click Run again.
- When the TortoiseSVN window set-up pops up, click next.
- Accept the terms, and click next.
- Click next again, then click Install.
- Then installation program will ask you to restart.
Getting Project Exodus onto your Computer:
- Go to your desktop, and create a new folder.
- Right click on the folder, and got to TortoiseSVN, export.
- This window should pop up:
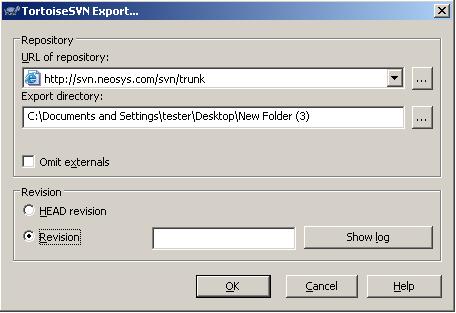
- In the URL field type in (or copy and paste) http://svn.neosys.com/svn/trunk and click Ok.
- Another window will pop up, and start listing the files you are importing onto your pc.
- Click Ok, once loading is finished.

For help on how to use: http://devwiki.neosys.com/index.php/Installing_and_Using_Tortoise_Subversion
Boost C++ Libraries 1.34.0
- Go to http://www.boost-consulting.com/products/free
- Click the 2nd download, Boost 1.34.0 Installer.
- Click Run and again.
- Agree to the licenses.
- Click Next.
- Tick the Visual C++ 8.0 (Visual studio 2005).
- Tick the first two Variants.
- Now untick every box except:
- BoostRegex
- Boost DateTime
- Boost FileSystem
- Boost IOstream
- Boost Thread
- Boost ProgramOptions
- Boost header files
- Start menu shortcut
- Source and Documentation
- Tools.
- BoostRegex

9. Click Next, Install. (take note of where you saved boost).
Downloading & Installing Visual Studio C++ Express Edition:
- Go to http://msdn2.microsoft.com/en-gb/express/aa700735.aspx
- Click on the download button near the top right hand of your screen.
- Scroll down the web page till you see 6 different downloads e.g. Visual Basic, SQL Server and Visual C++.
- Select your language for Visual C++ 2005 Express Edition, as soon as you select your language a "File download" window will pop up, click Run.
- There should be a bit of loading, once finished click Run and again.
- There should be a minute or two of loading, click Next in the Visual Studio C++ set-up.
- Accept the terms and click Yes.
- Tick the Graphical IDE if it hasn't been ticked already and click Next.
- Browse for a location in where you would like Visual Studio C++ (although, it would be best to keep the default location in case something need to find the Visual Studio C++ folder and cannot find it in its default location) then click Next.
- If you have any minor jobs to do, I suggest you do so now as it will take a while, but keep checking on how the installation is coming.
- Then reboot your computer.
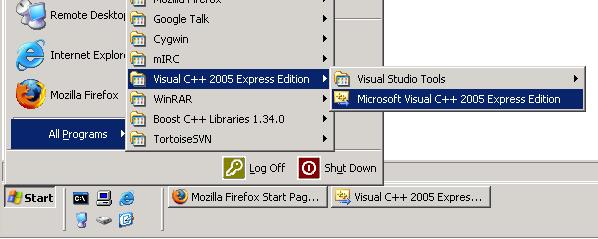
- Once your pc is ready look for Visual Studio C++ on icon your desktop, if its not there go to start, all programs in the start menu and look for Visual Studio C++ Edition as show below:
- The window below will pop up, telling you that you need to register your copy of Visual Studio C++ Express Edition.


Downloading & Installing Platform SDK:
Part 1
- Go to http://www.microsoft.com/downloads/details.aspx?familyid=0baf2b35-c656-4969-ace8-e4c0c0716adb&displaylang=en.
- Click on the Continue button.
- Depending on your internet browser, you might have to install a plug-in. IF not, scroll down the web page and click on the Continue button.
- Click on the link called "Download Files Below" or you can just find the subheading Files in this Download
- There will be list of different types of files, depending on your processor to download.
- If you have a Intel processor download PSDK-ia64.exe
- If you have a AMD processor download PSDK-amd64.exe
- If you have another processor type, and it's listed on the web site but not here chose that Download.
- If you have another processor type which is not included in the list on the web page download PSDK-x86.exe
- Save the file into your download folder.
- Then click Run, Then click Run again.
- After a second or two, you come to a rectangular window, with two button, click Cancel.
- Click Next.
- Agree to the terms, and click Next.
- Do a custom installation, and click Next.
- You come to a stage in the set-up where it asks "In which driver do you want to save you files to?". Pick the drive you prefer. To change from drive to drive you change the beginning of the location. So if you want to save SDK in the C drive, leave it as it is and if you want to save SDK to the D drive, change C to D. Or click browse. Then click Next.
- Click Next again, and wait a second for the loading.
- Then continue the download, till the end.
Part 2
- Run Microsoft Visual Studio C++ Express Edition.
- On your screen you should see:
click on agency, and on the left hand column you should see: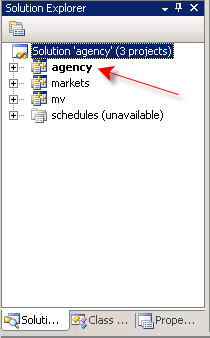
- Go to Tools, Options and open Project and Solutions.
- Your window should look like this:

- Click the button that looks like a yellow folder, and in the field where your cursor should be blinking, copy and paste the following path Executable files path, and press Enter: C:\Program Files\Microsoft Platform SDK for Windows Server 2003 R2\Bin.
- Click the drop down menu for Show directories for: and click Include Files, now click the button that looks like a yellow folder and in the field were the cursor is blinking copy an paste the following path, and then press Enter: C:\Program Files\Microsoft Platform SDK for Windows Server 2003 R2\Include.
- Click the drop down menu for Show directories for: and click Library files, now click the button that looks like a yellow folder and in the field were the cursor is blinking copy an paste the following path, and then press Enter: C:\Program Files\Microsoft Platform SDK for Windows Server 2003 R2\Lib


Compile by pressing F5.
Helpful Websites
- http://msdn2.microsoft.com/en-gb/express/aa700755.aspx for help on Microsoft Visual Studio C++ Express Edition.
- http://www.boost.org/ for help on Boost
- http://www.postgresql.org/ for help on PostgeSQL
- http://www.win-rar.com/winrarsupport.html for help with WinRAR.
- http://tortoisesvn.tigris.org/ help on tortoiseSVN.
- http://devwiki.neosys.com/index.php/Installing_and_Using_Tortoise_Subversion on how to use tortoise subversion